Search Windows and Linux Networking

Tuesday, March 18, 2014

How to print or display colorful text on screen in terminal or in bash scripting with echo command

How to print or display colorful text on screen in terminal    


 It is always good practice to show your script related information in colorful text in terminal to highlight or attention to the user. for example you can give output of script test as successful or fail in Green and red color, you can also display error message in Red color so user can attention for result\Output.

There are many method to do this for example with help of sed , awk , echo and may more. I will show you how to display text in colorful output with the help of echo command.

suppose you wanted to display only Hello world in Red color. you can do this with echo like follow

echo -e "\e[0;31m Hello World \e[om"

or
echo -e  "\033[31m Hello World \033[0m"
Hello World

suppose you wanted to display only Hello in Red color and World in Blue then your command look like follow

echo -e "\e[0;31m Hello \e[0;34m World \e[0m"
or
echo -e  "\033[31m Hello \033[34m World \033[0m"
Hello World


For Bold text Hello  World command looks:

echo -e "\e[1m Hello World\e[0m"
or
echo -e "\033[1m Hello World\033[0m"
Hello World

to underline the Hello world command is as follow:

echo -e "\e[4m Hello World\e[0m"
 Hello World
echo -e "\e[4;31m Hello World\e[0m"
 Hello World

Following are some other color code you wanted to use in your script.


Black 0;30
Red 0;31
Green 0;32
Orange 0;33
Yellow   1;33
Blue 0;34
Purple 0;35
Cyan 0;36
Light Gray 0;37


Friday, March 7, 2014

How to check File or Folder exist in Bash Scripting

How to check file of folder exist in Bash scripting.


When we write any bash scripting many time, we wanted to performing any task base on validating  for file or folder is exist or not . There are many ways to check for file or folder in Bash Scripting. In following example we will see how to check file or folder exist or not to do some task.


Suppose you wanted to check if folder name Backup exist in path /home/Backup and if it does not exist then create new folder as Backup in /home directory and if it exist the display the massage saying Backup folder exist. and you also wanted to check if file name backup.tar exist in path /home/Backup directory and if it doest not exist then create tar file as backup.tar in /home/Backup directory and if it exist then display massage that saying backup.tar file exist.


!#/bin/bash

# SCRIPT: backup.sh
# AUTHOR: Your Name.
# CONTACT : Your Contact details.
# DATE: 06th Mar, 2014
# REV: 1.0 A

# PURPOSE: To check Backup folder and backup.tar file exist or not. If not exist then create  Backup directory in path /home and backup.tar file in /home/Backup direcoty.

# 1st Way to check folder exist.

test -d /home/Backup
if [ "$?" -eq 0 ]
then
   echo "\"/Backup\" Directory exist in /home"
else
   echo "\"/Backup\" Directory does not exist in /home"
   echo "Creating /\"Backup\" Directory in \"/home\" Directory."
   mkdir /home/Backup
fi


# 2nd Way to check folder exist.

if test -d /home/Backup
then
   echo "\"/Backup\" Directory exist in /home"
else
   echo "\"/Backup\" Directory does not exist in /home"
   echo "Creating /\"Backup\" Directory in \"/home\" Directory."
   mkdir /home/Backup
fi

# 3rd Way to check folder exist.

if [ -d /home/Backup ]
then
   echo "\"/Backup\" Directory exist in /home"
else
   echo "\"/Backup\" Directory does not exist in /home"
   echo "Creating /\"Backup\" Directory in \"/home\" Directory."
   mkdir /home/Backup
fi

# There are also many other ways to check folder. for like using "ls -ld /home/Backup" command .
# To check file method is same as above just replace -d option with -f if you wanted to check file and if you wanted to check link replace with -l option.

# 1st Way to check file exist.

test -f /home/Backup/backup.tar
if [ "$?" -eq 0 ]
then
   echo "\"backup.tar\" file exist in /home/Backup Directory"
else
   echo "\"backup.tar\" file does not exist in \"/home/Backup\" Directory"
   echo "Creating \"backup.tar\" file in \"/home/Backup\" Directory."
   cd /
   tar -cvpf /home/Backup/backup.tar /home/sandeep
fi

# 2nd Way to check file exist.

if test -f /home/Backup/backup.tar
then
   echo "\"backup.tar\" file exist in /home/Backup Directory"
else
   echo "\"backup.tar\" file does not exist in \"/home/Backup\" Directory"
   echo "Creating \"backup.tar\" file in \"/home/Backup\" Directory."
   cd /
   tar -cvpf /home/Backup/backup.tar /home/sandeep
fi

# 3rd way to check file exist.

if [ -f /home/Backup/backup.tar ]
then
   echo "\"backup.tar\" file exist in /home/Backup Directory"
else
   echo "\"backup.tar\" file does not exist in \"/home/Backup\" Directory"
   echo "Creating \"backup.tar\" file in \"/home/Backup\" Directory."
   cd /
   tar -cvpf /home/Backup/backup.tar /home/sandeep
fi


# END

you can use any one method which is comfortable to you .

Saturday, February 15, 2014

How to upgrade Windows 2008 R2 SP1 Hyper-V to Windows 2012 R2 Hyper-V (step-by-step)

I am planning to move my Hyper-V environment to latest Windows 2012 R2 from my current Windows 2008 R2 SP1 environment. For that I created test environment as my current to test several things. During that I came across lots of challenges, especially with export-import method and with the VM’s having checkpoints taken in a running states.

After doing some testing I found two methods to do the up-gradation.

1) First method is to use an intermediate server (this can be used if you already exported your VM and deleted the original VMs). In this method you will export the VM from the 2008R2 host and then import in 2012 Hyper-V host (no need to start it up) and then export it again from the 2012 Host and import it in 2012 R2 host.

2) The Easiest way will be to turn off the VM on the hyper-V 2008R2 host and stop the VMM service on the host server as well to unlock all VM files. The next step is to copy all Virtual Machine files/folder including the VHDs, XML, etc. to the server 2012R2 and import them directly.

I decided to go with second method to avoid use of another Hyper-V server and perform format & reinstall method, so that it will stop VMM Service while format. There is a critical prerequisite for this approach. None of the virtual machines files should reside on the C: drive. Sadly, the designers of Hyper-V continue to use a subfolder on the C: drive as the default locations to store The VM XML files & Virtual Hard Disks.
(I will highly recommend trying upgrade in your test environment first & having a backup while doing anything in your production environment).

I created my test setup as below.

Installed Windows 2008 R2 SP1 with Hyper-V role, made sure that management OS partition and VM storage are on different drives.
Created test VM with three snapshots. First two snapshots (Snap1 & Snap2) taken while VM in running state & third snapshot (Snap3) taken while VM in stopped state.

I performed below Step-by-step to complete my test upgrade.

1) Make sure that all your VMs are in “Off” state.
2) Insert Windows 2012 R2 installation disk in to DVD drive and install Windows 2012 R2 by formatting existing Windows 2008 R2 SP1 OS drive. (Make sure that you are keeping your VMs on different drive other than OS drive.)
3) After installing the OS, install Hyper-V role, create virtual switch and also install latest windows patches.
4) Now open Hyper-V Manager in newly installed Windows 2012 R2 hyper-V server.
5) Click on Import Virtual Machine in Actions pane. It will open Import Virtual Machine wizard. Click next on below screen.
6) On next screen provide the path where VM to be imported is stored. Click next.
7) On below screen select the VM to be imported. Click Next.
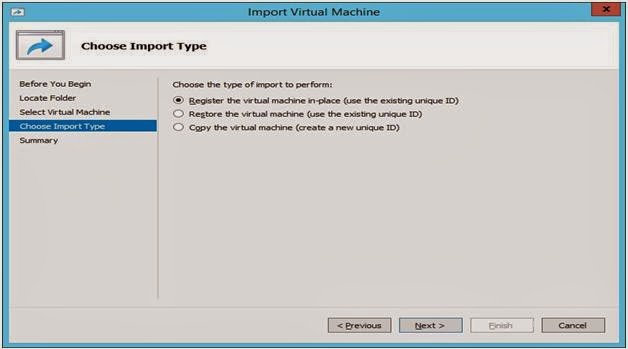
8) Select “Register the virtual machine in-place (use existing unique ID)” and click next.
9) On below screen select the location where VM hard disks are stored (in my case it was same). Click next.
10) If you are having snapshot of VM taken in running state, during VM loading process it will give you below “Saved State Error “, Click on “Delete Saved State”.
(I have got this warning for first two snaps, as I took them while vm in running state.)
10) If you have configured virtual network switch with different name than that was in Windows 2008 R2 SP1 Hyper-V, it may ask you to specify VM network to connect to. Specify the same and click next.
11) On summary page, review summary and click finish. It will import the VM.

Post Import tests & tasks.

12) After completing these steps, I performed some tests. Like starting VM.
13) Applying Snap1 (you will need to start VM after applying Snap as saved state has been deleted).

14) Applying Snap2
15) Finally you will also need to upgrade Guest OS Integration Components for each VM.

Hope this will be helpful to you. Also share if you have any suggestions